

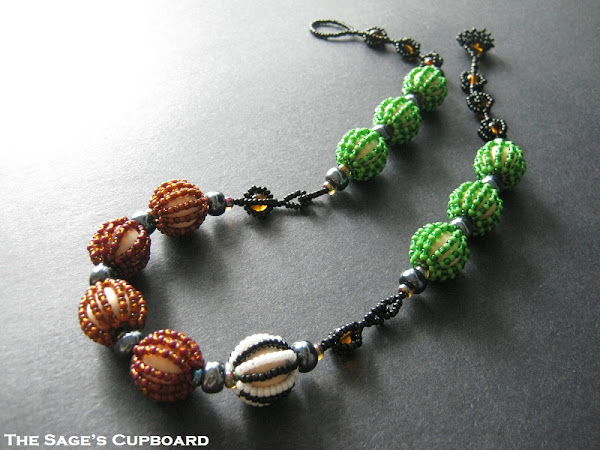
You can use just about any round, large-hole bead for this technique. Wooden macramé beads are ideal because they are lightweight, and they won’t damage the threads with sharp edges. Size 11/o seed beads are also recommended for the best coverage and overall bead shape, with Fireline thread for strong tension.
To Make a Bead Covered Bead
Start by cutting a comfortable length of Fireline, between one and two yards, and thread a needle on one end. Leaving about an 8 inch tail, stitch up through the macramé bead twice, to secure the thread around the bead.


To prevent seed beads from slipping into the hole as you work and causing a big mess, it is important to cover the bead holes at all times using the thumb and forefinger of your non-stitching hand. Placing your seed beads in a shallow dish or on a beading tray while you work will make one-handed stitching easier. Keep the tail thread pressed against the bottom of the bead with your thumb to maintain tension on the first few rows.


Pick up enough seed beads to cover the outside of the macramé bead from hole to hole, leaving a few millimeter gap on either end. Add or remove seed beads until you have the desired length, then stitch up through the macramé bead, being careful not to let any seed beads slip into the hole. Pull the thread snug.


Pick up the same number of seed beads, less one, and stitch up through the macramé bead. Pull snug. For the third row, pick up the same number of seed beads as row one. You can move from left to right, or right to left, but continue in the same direction once you begin. Rotate your grip on the macramé bead as you work, but be careful to maintain coverage of the holes to keep the seed beads in place.
If a strand of beads does not fall into place correctly, gently use your needle to nudge the thread into position before pulling snug. If at any point you make a mistake, or need to undo a stitch, do not try to pass the needle back through the macramé bead. Always remove the needle, and gently pull the thread out from the back.


When the bead starts to become full, it will be more difficult to cover both holes on the macramé bead. Use you forefinger instead to hold the previous rows in place as you work, and keep an eye out for stray seed beads.
If a bead or two does slip into the hole, use the tip of your needle to pierce the bead, and then ‘scoop’ it out gently, being careful not to damage any of the threads. Push the bead back into place on its row. It is best to catch these stray beads as early as possible. Even with the most careful stitching, the core of the bead can become criss-crossed with threads, making recovery of lost beads more difficult.


Continue adding new rows, alternating between long and short using the bead quantities you determined in the first two rows, until you have the amount of coverage that you want. Finish with a short row, then stitch down into the very first row added, moving a few beads at a time. Stitch up through the macramé bead, and then through the second row of seed beads. Continue reinforcing the rows, pulling the thread as snug as possible with each stitch to achieve the best tension throughout.
Tie off your thread at the top of a row, using a half hitch knot, then pass through most of the remaining beads, and trim the thread. Untie the tail thread by passing your needle underneath, and pull up to loosen and remove the stitch. Weave the tail in, finishing with a half hitch knot.


For added stability, brush the threads around the bead holes with one or two coats of clear nail polish or other clear lacquer. Make sure that the varnish is completely dry before using your covered beads in a project.
You can get even more coverage on a bead covered bead by using three or more row lengths in an even pattern, such as: 3 2 1 2 3 2 1 2... The number of rows, lengths, and seed beads per row will vary by the size of the base bead that you use.
Happy beading!
Copyright 2012 Inspirational Beading
Subscribe to Inspirational Beading
Get inspired on Facebook and Google+


Great tutorial...
ReplyDeleteeasy. love it!! thanks for sharing
I love the looks of this. Wood is one of my favorite materials, but the seed beads make it look somewhat airy not earthy. i have a large collection of wooden beads from doing christmas ornaments and I will surely try out your tutorial. Thanks!
ReplyDelete